|
||||||||||||||||||
Communications Console Desk & Room - Sneak Preview |

|
|
|
#1 |
|
Legendary Saboteur
Offline Posts: 2,138
 -->
-->
Join Date: Apr 2007
|
I thought while I was making this shipping container I'd get all tech'd up and make a communications room, the scale would have to be fitting to the microman smart body and of course be similar to the playmobile furniture i'd been using, so knowing what i have to build and figuring out the parts and size is a challenge.
I set to work on the chair and the main desk, I started out this build because I couldnt win the Playmobil Airport Console Desk on ebay, having twice lost out on those I decided to build my own. This is a sneak preview and is NOT the final communications room, however the console desk is my final design that i'll be using. Hope you guys like it  Rich 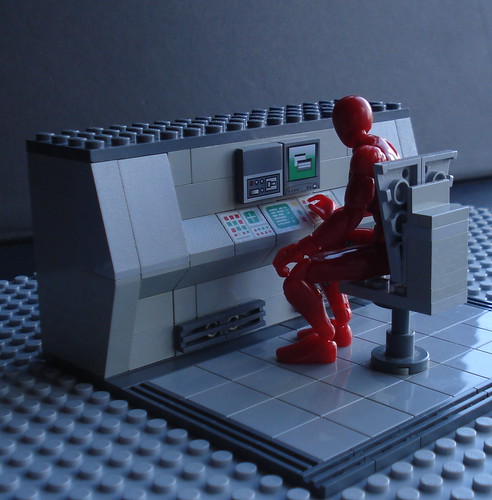
__________________
My Sites Eternity Toys Superiorville Toy blog Urban Saboteur Stories Social Sites & Communities Flickr Tweet Me |

|

|
|
|
#2 |
|
Senior Member
Offline Posts: 291
 -->
-->
Join Date: Dec 2010
|
dude, that is tight!
__________________
checkout my pictures! http://www.joedios.com/dioramas/browseimages.php?do=member&imageuser=4307 |

|

|
|
|
#3 |
|
frozn 4 awhile
Offline Posts: 7,605
 -->
-->
Join Date: Jun 2008
|
Sometimes our imagination is the best thing we can use!!! That looks great!!!
__________________
 Whos Da Masta http://www.youtube.com/watch?v=jrXSWI0oWHg |

|
Wow! |

|
|
|
#4 |
|
G.I.JOE ITALIAN COLLECTOR
Offline Posts: 27,808
 -->
-->
Join Date: Jan 2007
|
Awesome work!
 |

|

|
|
|
#5 |
|
Veteran
Offline Posts: 651
 -->
-->
Join Date: Jun 2007
|
Yeah, that looks great already !
A couple of questions : Are you going to cover the top with tiles, or are you going to leave the studs out in the open ? And how do you feel about the mix of old and new grey ? For the console that works okay; the lines between the bricks already create the look and feel of separate panels enclosing the machine, and it's okay if those panels have slightly different colors. But isn't it a bit annoying that the uniformity of color is broken for things like the back support of the chair and for the large surfaces of that container of the other thread ? |

|
Questions: Answered. |

|
|
|
#6 |
|
Legendary Saboteur
Offline Posts: 2,138
 -->
-->
Join Date: Apr 2007
|
I'll answer your first question. Yes I will cover the top at some stage, As I mentioned it's a W.I.P or sneak preview and by no means finished.
At some stage during my builds I substitute bricks I dont have with a closest colour match to see what it looks like. In some cases I leave things as they are, with the colour differences on the container it could be used to similate wear and tear on the container or I could just go and replace all the new bricks with old pieces and vice versa. I guess its more time vs money. The two colours are Light Bluish Grey and Light Grey, I prefer to use the light grey because its a more natural colour and more widely available. The other issue is that sometimes sellers on bricklink have different listed greys than the official lego shop, in the floor tiles they are listed as light stone grey which i got from Lego's official pick a brick, there is no Light Stone Grey on bricklink.  I definately might go back and replace some of the parts at a later date, and as I mentioned above its by no means a complete finished project yet, I have quite way to go before its finished. Thanks for the feedback 
__________________
My Sites Eternity Toys Superiorville Toy blog Urban Saboteur Stories Social Sites & Communities Flickr Tweet Me |

|
Update |

|
|
|
#7 |
|
Legendary Saboteur
Offline Posts: 2,138
 -->
-->
Join Date: Apr 2007
|
Hey Guys,
So I have a brief update on this. I've built the other Communications Monitors that I wanted. I have also received the printouts that I am going to use for the screens. I'd like to add that forum member Seyms sent me these, thank you so much for helping me out with the build  Before I post the pictures here is a brief update as to what has been decided about the room/build: *1 The communications console top will eventually be covered with tiles (in most of my builds I get the build right first then decorate with tiling afterwards). *2 The room will eventually be expanded into an actual full scale building considering how big my shipping container is, this will be quite a large building even for my own building experience. *3 The room will feature 4 screens with changeable channels (using the printouts my friend Seyms sent me). *4 I plan to build a few desks and various other office based stuff like cabinets and telephones. Now for the updated photos: 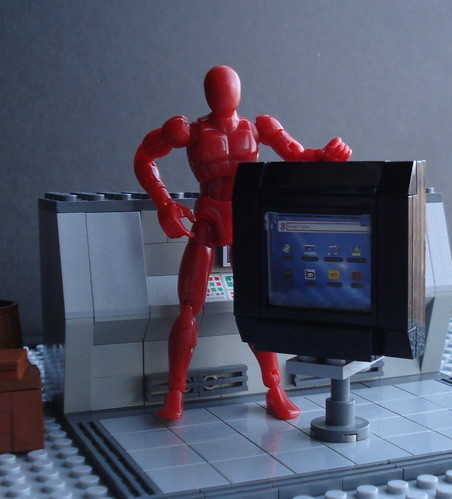   I've also since built a secondary desk to join up to the 1st console desk. I should have some pictures of this uploaded shortly. Hope you like the updates. Rich
__________________
My Sites Eternity Toys Superiorville Toy blog Urban Saboteur Stories Social Sites & Communities Flickr Tweet Me |

|
Update! |

|
|
|
#8 |
|
Legendary Saboteur
Offline Posts: 2,138
 -->
-->
Join Date: Apr 2007
|
So today I thought I'd post up a picture to show the monitors as well as the second console desk that is joining the 1st one i built.
 I've not quite made a decision on if I should bracket the monitors to either wall (2 on either side) or make a gantry and suspend them from the ceiling. I will probably make a decision on this once I start building the surrounding walls as I work out the height and other details. Just a quick note regarding the consoles and brick pieces. I am hoping to find matching grey colours so the bricks aren't out of colour, in some of the photos you will probably notice two types of grey, the most common is Light Grey where as the newer colour (light bluish grey) has been used on occasions when I didnt have the part available in the other colour, this is just a temporary thing and obviously i'll want to match all these colours up properly and have the pieces in the right colours, it just takes a little time to find the pieces at the right cost from bricklink, ;-) From the photo you'll also be able to see that i've added the 1x8 and 1x4 Grey Tiles to the top of the console desks. This is coming along really nicely and i'm pleased with it so far. Rich
__________________
My Sites Eternity Toys Superiorville Toy blog Urban Saboteur Stories Social Sites & Communities Flickr Tweet Me |

|
Update! |

|
|
|
#9 |
|
Legendary Saboteur
Offline Posts: 2,138
 -->
-->
Join Date: Apr 2007
|
The room is now starting to take actual shape as a room
 rather than just be a communications console desk rather than just be a communications console desk  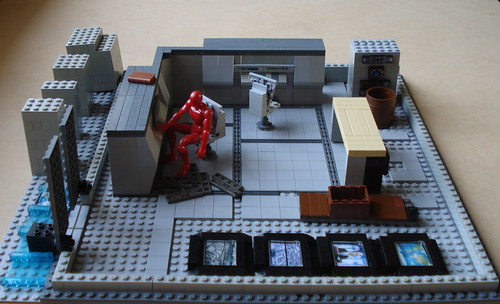 So you can see from this picture I've placed panels where the doors will be. I have also added the inner wall as well as the desk and the server bank including plug sockets on the wall. 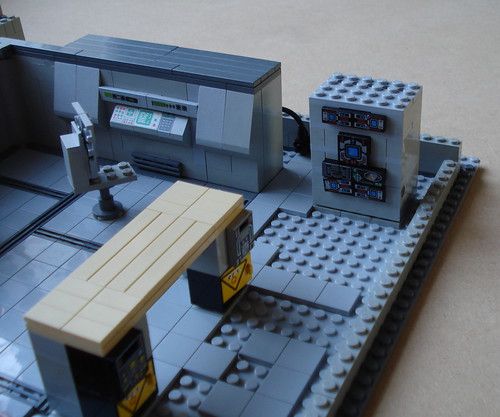 The desk colour will be changed, i've been using placement parts to see how it would look.  Hope you guys like the updates. If you think of anything I might of missed or want to see please post a reply, as I might not of thought to include it.  This is still a work in progress and is nowhere near finished yet. In friendship Rich
__________________
My Sites Eternity Toys Superiorville Toy blog Urban Saboteur Stories Social Sites & Communities Flickr Tweet Me |

|

|
|
|
#10 |
|
Senior Member
Offline Posts: 151
 -->
-->
Join Date: Nov 2005
|
I know it's an old thread, but I absolutely love the desk made from Lego parts. Any chance you could tell us what set's pieces you used? I would LOVE to have a few consoles like this around my base!
thanks!
__________________
JLT AKA Jack Left Town Un-Official Valiant Comics Archivist WANTS: The head of General Joe Colton |

|
 |
«
Previous Thread
|
Next Thread
»
| Thread Tools | |
| Display Modes | |
|
|
Powered by: vBulletin Version 3.0.6
Copyright ©2000 - 2024, Jelsoft Enterprises Ltd.
Style Design By: vBStyles.com
Copyright ©2000 - 2024, Jelsoft Enterprises Ltd.
Style Design By: vBStyles.com


 Linear Mode

